A rebuild wipes your VPS and installs a fresh copy of an operating system from one of our templates. It's the quickest way to start over, switch distributions, or recover from a mess you'd rather not debug. It destroys everything on the VPS's disks, immediately.
What a rebuild does
The portal re-installs your virtual machine from the template you choose and replaces the contents of all of its disks. When it finishes you have a clean server running the OS you picked, with the root password you set. Everything you installed, configured or stored on the old system is gone.
Which template should I pick?
The OS Template list shows what we offer for a Smart VPS:
| Family | Versions | |---|---| | Debian | 13, 12 | | Ubuntu | 26.04, 24.04, 22.04 | | AlmaLinux | 10, 9, 8 | | CloudLinux | 10, 9, 8 | | Fedora | 44, 43 |
If you're not sure, Debian 13 or Ubuntu 24.04 are sensible, widely documented choices. If you plan to run cPanel, choose AlmaLinux 9 or CloudLinux 9.
Before you start
- This destroys all data on the VPS, and it can't be undone. Copy off anything you want to keep: websites, databases, configs, mail, SSH keys. Put it somewhere that is not this VPS, such as your own computer or another server.
- A snapshot or backup is a good safety net, but don't count on one being restorable after a rebuild until you've checked. Copy the important files off yourself.
- Decide on your new root password. The portal fills in a generated one, which you can keep.
- Keep your own SSH public key handy so you can add it to the fresh system.
Steps
- Log in to the portal at https://noc.versaweb.com.
- Click Services, then Smart VPS Servers, then click your VPS.
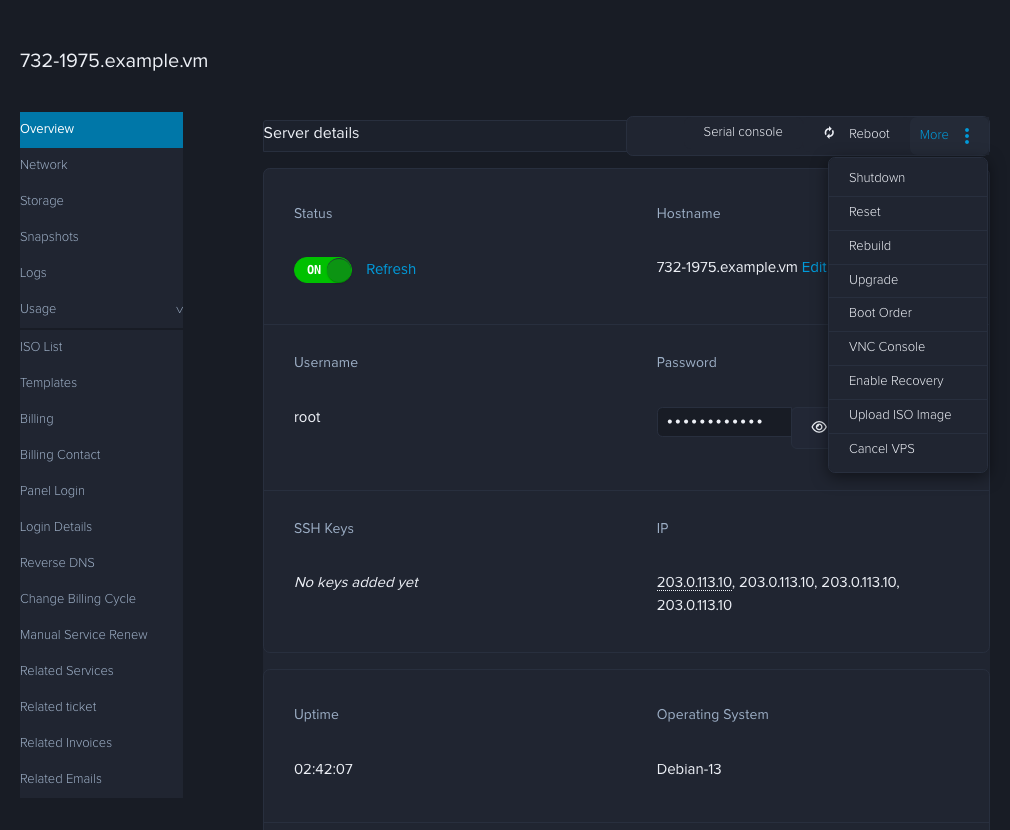
- On the Overview tab, click More (the three dots) near the top right, then Rebuild.
- On the Re-Install VPS page, choose your OS Template from the dropdown.
- Look at the Password box. It's pre-filled with a generated password. Click the eye icon to see it, the arrows icon to generate a different one, or type your own. Write it down now.
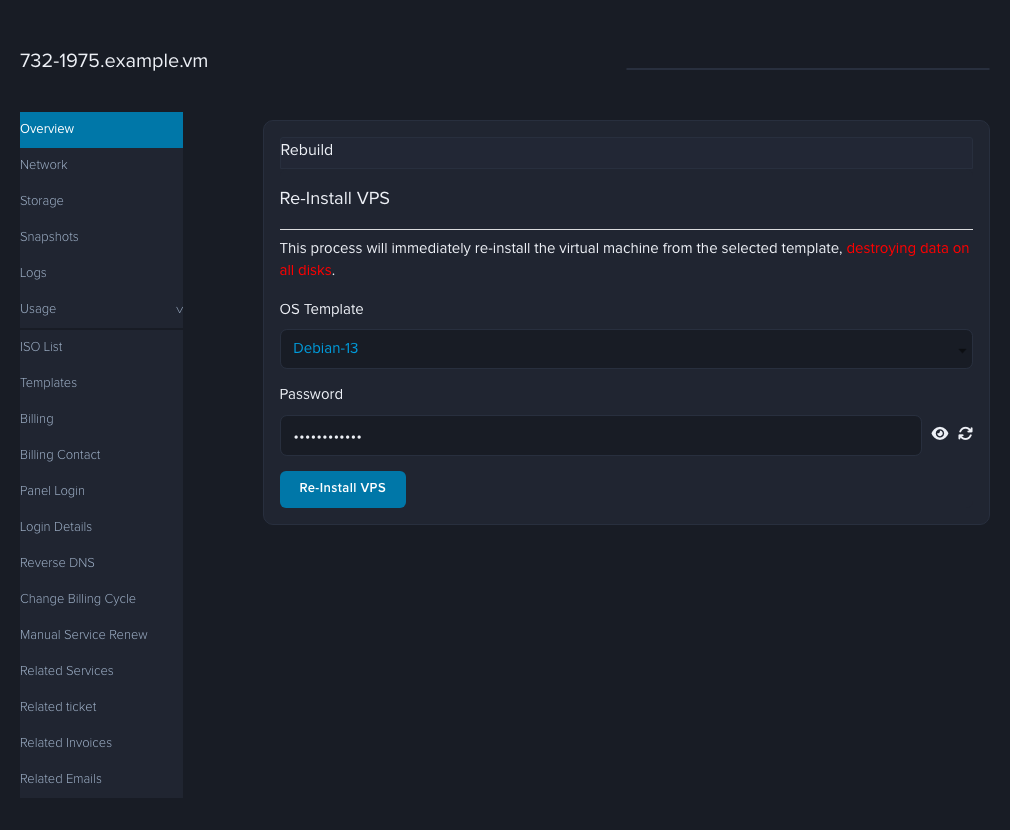
- Click Re-Install VPS and confirm if the portal asks you to. The wipe starts immediately.
- Wait. The VPS shows a "Server is performing task" banner and a rebuild status while it works. When the banner clears, the new system is ready.
After the rebuild
- Log in over SSH as
rootwith the password you set:ssh root@YOUR.IP.ADDRESS. - If SSH warns "REMOTE HOST IDENTIFICATION HAS CHANGED": that's expected, because the server is new and has a new host key. Clear the old one on your own computer with
ssh-keygen -R YOUR.IP.ADDRESS, then connect again and accept the new key. - Update the system (
apt update && apt upgradeon Debian and Ubuntu,dnf upgradeon AlmaLinux, CloudLinux and Fedora). - Check your hostname is what you want. See How do I change the hostname of my Smart VPS?.
- Add your SSH keys, restore your files, and reinstall your software.
How to check it worked
- The VPS shows as running and the Operating System row on the Overview tab names the template you chose.
- You can log in as
rootwith the new password.
If it didn't work
- The page won't let you click Re-Install VPS. Check that the VPS isn't already busy with another task (look for the "Server is performing task" banner) and try again once it clears.
- You can't log in with the new password. Open the console from the portal and check the server booted. See How do I open the console for my Smart VPS?.
- SSH says "Connection refused" or times out. Give it a few more minutes, then check the console.
- Still stuck? Open a ticket under Technical Support with your IP address and the template you chose.